Showing posts with label farmhouse. Show all posts

Sunday, July 28, 2019

Year of Projects Week 4

It's Sunday again, I was off a couple of days and they went way too fast!

I have a couple of almost finishes and I even visited a Yarn Store and managed to stick to my Cold Sheep.

E and I traveled to Nags Head which is part of the North Carolina Outer Banks, only a couple of hours north from us, to pick up a couple of mugs from a potter she follows on Instagram. Her online sales generally sell out so we went straight to the source. Being crafters with small businesses of our own we try very hard to support others. Her business is Swell Ceramics and this is her instagram, if you are interested in some very beachy type mugs and cups.

While we were there we ran over to South Beach take out, which has a truly awesome menu of vegan, and other options, it can be hard to find really good food for different dietary options, but they really do a great job. If you are out that way check them out.

The best part of that is in the same shopping center is a yarn store, Yarn and More. I know who expects to find yarn at the beach, I was very thrilled! I love an Local Independent yarn store, especially one with such a great selection. They had some very beautiful yarns, all the supplies you need, in case you happen to have left your favorite hook at home or need a new project, and even cross stitch supplies. I'm hoping to get back up there soon, maybe in the fall after the tourist season is over. While I oohed and awwd over lots of beautiful yarn I left empty handed with the promise to come back once I've moved a few more projects out. It wasn't easy but I'm determined.

So that brings me to the Peach Blossom Blanket. The squares are all joined and now it's time for the boarder and about a thousand ends to be sown in .I'm pretty sure that I'll be doing some kind of fan stitch for the boarder, just the gray, since I have this huge skein to use up..lol


I've made great headway on the pillow too. Hexi's join easily, I think my biggest concern was color placement. I should have that finish this week and another one started by next weekend. I need a cushion for the rocking chair too, so I'm thinking same color palette. I have ideas for a couple of other pillows and I have the fabric and the pillow forms so there's a couple of more items heading out of the craft room too. I'm hoping to have a bit more working space come winter, which is when I have more time for crafting.


We've had a nice end to the week weatherwise and so I've been spending more time than normal in the yard, trying to get this  hot mess under control..lol. But I'm thrilled to be making the head way I have, but there is still lots to finish and so many things I'd love to start.

So my Year 9 progress is: 
615 yards Yarn in and 782 yards out.
I jelly roll in process in and none in.

I'm still on the positive side and I can add a pillow form too!


I hope everyone has great week and If you'd like to join us or just love a to see some seriously talents crafters at work, check out all of the blogs who are participating in a Year of Projects!


Tuesday, July 10, 2018

Famous Chickens!


Amazon       Barnes and Nobles      Author's Website

If you love chickens, have a backyard flock or wish you did this is a coffee table book for you!
This book is full of enchanting pictures of Kathy Shea Mormino's flock, beautiful backyard and coops.Ms. Mormino is the self described Chicken Chick, who gives tips on having a healthy backyard flock. She has also been an advocate for backyard chickens in communities for many years.

This book however is not a how to book, it's really a "look how beautiful my Girls (and Roos) are" and I totally agree.  Kathy's Chicken's have been facebook and Instagram stars for a while and now she's sharing them with the rest of the world in book format! The adoring public has followed along with their ups and downs and now they are immortalized on paper.

Beautiful scenes are captured in the pages and the ever iconic Rachel is even given her own chapter!
You'll fall instantly in love the Araucanas and Frizzles, Marans and Cochins (think fuzzy feet).
The seasonal photography is breathtaking and it will make you want to pull up a chair and visit with them for a while.

She starts with the littles and seriously what's cuter than a baby chick? I personally have chickens and I can tell you that they have personalities from day one. It's an amazing thing to watch them grow from fuzzy little poofs to mini dinosaurs with their own distinct personalities.

Later chapters are for the girls and another for the boys. As I the perused the pages I saw many expressions that I have seen in my own flock. Scarlet steals my heart, she looks like our Martha and even has the same attitude, I wonder if it has something to do with being a redhead?

And of course there is a whole chapter on the Fluffy Butts, who doesn't love to see those bloomers?

Even better, if you are considering a flock of your own, there is an index listing every bird and their breed along with their name in the back. That way if you find The One, you'll know exactly what to ask for when at that next Chicken swap!

Chickens have so much personality and Kathy Shea Mormino has captured some of it in a most enjoyable way. This book would be great for kids, and adults alike. It is a picture book with some small amount of commentary. If you have someone on your gift list missing the farm life or dreaming of their own flock this book is a must.

I received a copy from Netgalley for an honest review.
This review is my own work and my own opinion.

Tuesday, May 22, 2018

Americana Rag Wreath DIY


Summer is almost here and while it is time for all kinds of celebrations it is also time for remembrances too. This Americana Rag Wreath is a great way to show off your Patriotism from your front door! It's simple, fun and brings lots of charm to all of your outside (or inside) get togethers this summer.


What you'll need:
1 14 Inch Foam Wreath
3/4 a yard of 6 different fabrics* (Mine were 44 inches wide) 
*You can pick more or less depending on your design groupings, but take into account how the colors and patterns look together. Complementary colors are best, I went with a Star theme and added a few stripes to give it more interest.


Start by cutting the fabric into 1.5 inch strips 14 inches long. Strips can be wider or longer, but this is the size that worked best for me. I liked the fullness of the longer strips, and a 1.5 of a inch width made a substantial knot. 

Once you have all of your strips cut you'll start tying them on to your wreath, by sliding the strips  under the wreath and tie on top using a double knot.  I alternated colors randomly and the location of the knots for aesthetic purposes as well as the way it "filled in" the wreath.

As you are tying the strips on, be sure to push them together so that it gives it a bunched appearance and ensures that the wreath is completely covered.

You can trim the lengths to make them more uniform or leave them as they are. I snipped a couple that were a bit out of hand..
The back is just as pretty as the front! 
You can see how I pushed  the strips them together for a fuller look. 
You could also add a short piece of ribbon or wire for hanging.


 This a great summer craft, it is even kid friendly. 
This would work for any season or holiday with a corresponding fabric.

Thanks for stopping by and I wish you and your's a very happy Memorial Day and a wonderful Summer full of Crafts and Sunshine.

If you love this idea but just don't have the time to make one for your home, This wreath or a version of it is available in my Etsy Shop, Farm2Ewe.


Wednesday, April 25, 2018

Extra Vases and What to do with them


Vases, old, new, clear, colored, we all have a few hanging around. Mine are under my kitchen sink and laundry room sink and it's quite possible that there are a few in the barn. It's not that I have gotten so many flowers in my life time but but I've inherited some and some were left over from other projects and some have been filled with flowers. But what to do with them other than let them take up much needed space? I've done the research and I'm ready to share it with you, so pull them out and get ready to repurpose.

Most vases have a lot in common, they are glass and they are clear, they don't a have lot of personality going for them so they end up hidden away. One easy fix is to give them a little notoriety with some paint and some embellishments. Then you can group them and different sizes and styles work together because they have something in common, color!

I love everything about this idea from Vera Morae

Can you believe these were once just clear glass from the thrift store?
Madigan Made tells you exactly how she got this cobalt color 

Are your vases a little on the plain side? No worry you can add some interested with Twine.

  Teach Craft Love used A bit of twine and some hot glue for a interesting display 
Here's an interesting tutorial on decoupaging with Lace by Urban Comfort, that would be great for adding a bit of Shabby Chic to a plain vase
Lace 2

Not looking to add more items to your counter top, how about using those vases in your garden? 
Glass Garden Ideas 4130
Add a bowl and you've got instant whimsy for your garden. 

If these mushrooms aren't enough for you how about slipping a vase over those not so pretty solar lights to turn them real decor like they did at My Frugal Home. How pretty would this be at night?! And if you have different types or shapes all the better/
How to Dress Up Cheap Solar Lights

No matter what you do with them, there are lots of ideas out there that will fit your style and budget. I hope this helps to get those gears turning to help clear out some of that cabinet space that those old vases are taking up.

I can't believe we are in the home stretch of the A to Z Challenge and I'm going to finish this year. I hope you all have had as much fun as I have and if you've learned something along the way so much the better. W is for Windows and I've been collecting these ideas for a while, so be sure to come back tomorrow and see what all the fuss is about!

Friday, April 20, 2018

Rags for Rugs


Rag- noun A piece of old cloth, especially something torn  from a larger piece.

Sheets, clothing and towels all wear out over time, like everything else, but should they be doomed to the dump. To hang around forever at a landfill, taking up space, just for a worn spot or a hole? Of course not! They can find a new life in your home with just a bit of time and ingenuity .

Rag rugs can be sewn, braided, woven, crocheted or worked like a latch hook for a fluffier style. The patterns, shapes and styles are limited only by your imagination. I'll give you some ideas on each kind and then the rest is up to you as to what will find it's way into your home.

Sewn Rag Rugs- The majority of this sort of rug is done with strips of cloth, sewn together to make large strips that are then rolled or coiled in a circle and then the coils are stitched to the coil next to it. This produces a round or oval shaped rug and by design is very sturdy and colorful. When deciding on this style rug you can either coil the strips of fabric, which would give you a thinner rug or you could coil the fabric over either cotton piping or a rope, which would make the rug a bit studier.
how to sew a fabric rug
The Ric Rac Blog has a great tutorial on sewn rugs, this one is done over a rope and doesn't require the strips to be sewn together before hand. 


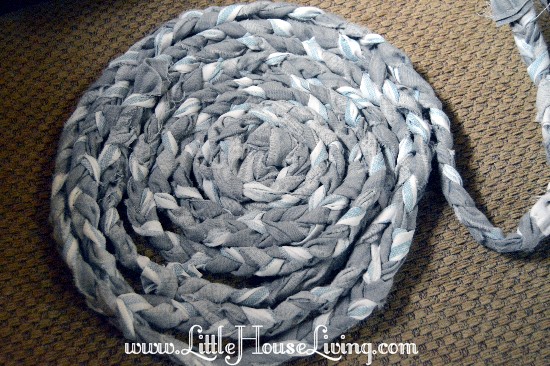
Braided Rugs- This is the same concept as a sewn or coiled rug except in the fact that the rug strips are braided into a long strip and then coiled. This enables the rug to have a bit more texture and is can be used in a higher traffic area, since they are a heavier option.
Marissa from Little House Living shows how to create your own Braided Rag Rug with a great how to on a very sturdy non sewn join.
How to Make Rag Rugs


Woven Rugs also use the sewn strip method but instead of a continuous roll the strips are a certain length.  Longer strips will be placed in the loom for the length and then shorter stips will be woven in an under /over pattern to join the lengthwise strips together.  Due to the weaving process these will generally be rectangular in shape but can have various thicknesses and textures depending on the processes used. You don't always have to have a loom to make a woven rug, check out Laura's option on A Beautiful Mess. She has taken weaving to a new but simple level and ends up with a truly neat project you can recreate in your home.
Make Your Own Woven Rag Rug abeautifulmess.com

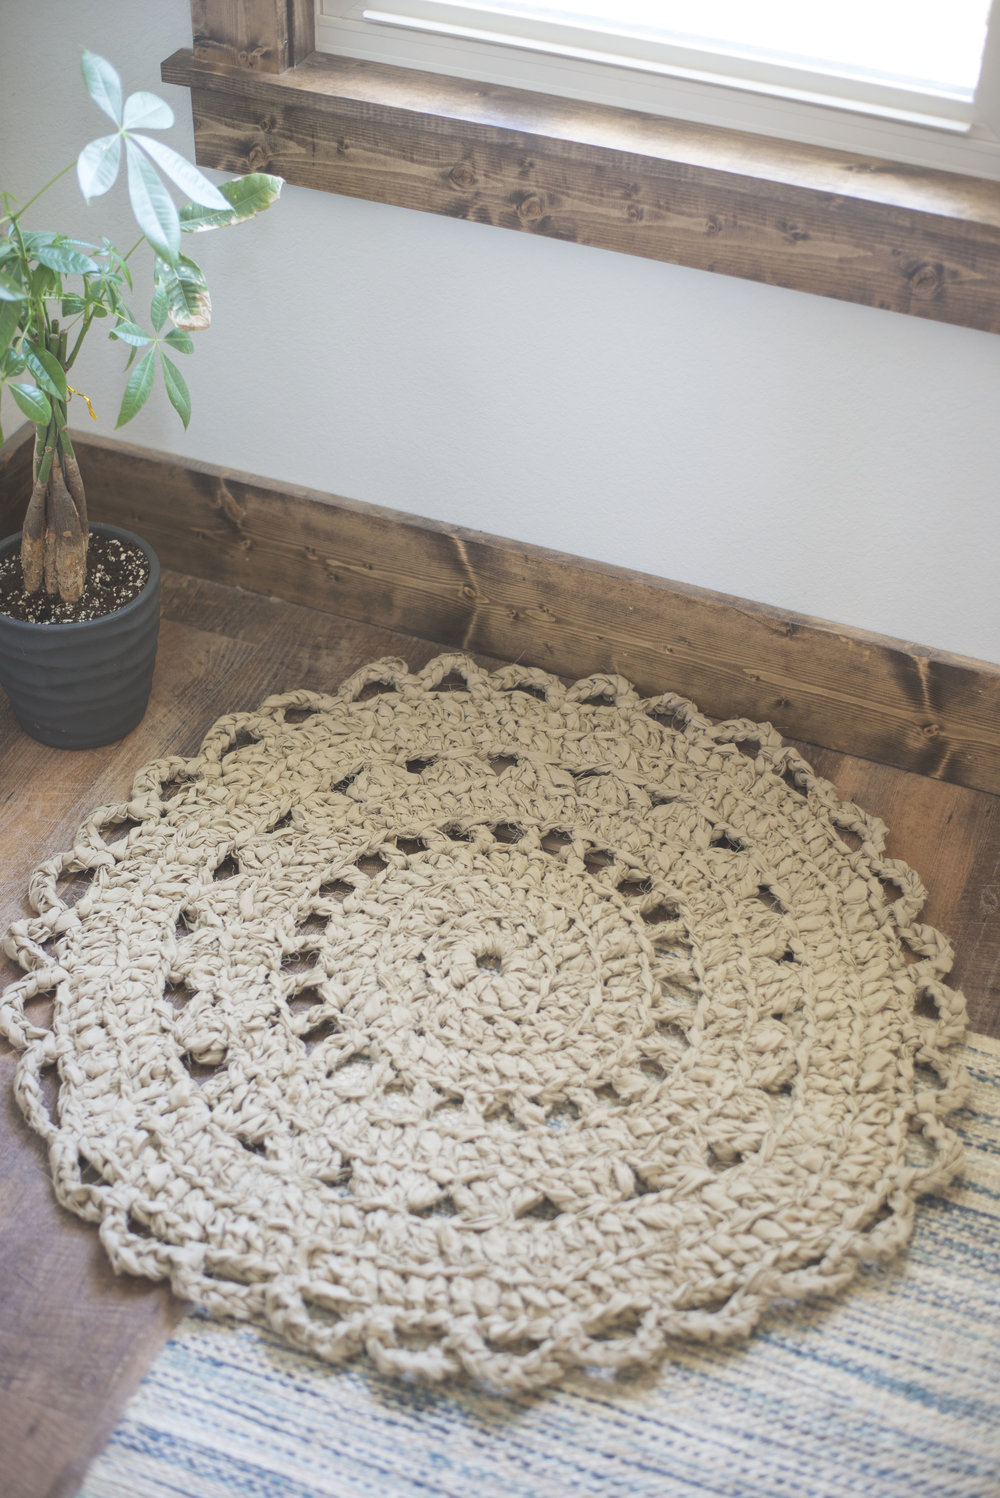
Crochet or knitted rugs, just like it sounds, strips of fabric are crocheted or knitted just like you would yarn. This enables the rug to take on many shapes or patterns. Often used for more artful pieces.
Not what you typically think of when you think rag rug! Instructions for this version can be found on 
She used sheets and gives all the details on how to create one yourself!

Latch hook fabric rugs are a lot like the latch hook kits so popular in years gone by. They use a backing and small strips of fabric which are left open on the top to give the rug a fluffy appearance. I would imagine this would be appropriate for a bedroom or a less traveled area but what a cute idea! As with all rag rugs the colors are very customizable.
 Jamie At Everyday Art created this rag rug for her daughters and has a very detailed and easy to follow instructions on her blog. These remind me of the shag carpet I had as a child! Ugg that might be giving away my age!


Rag rugs can be made out of most kinds of fabrics, sheets, or even denim. Don't have any extra scraps, shirts or jeans laying around? Check out goodwill, they normally have big bins of linens in all colors and at very good prices. You'll often put more time than money into a rag rug, but when you're keeping the materials out of the landfill that's a bonus.Then add the fact that you'll end up with a creation of your very own style, that makes it all worthwhile!

Thanks for playing along with me in the A to Z Challenge, there is a large group of very talented people who are also blogging the alphabet this month and you should check them out too. There are daily letter lists and the original list that can be stored by content or by theme. But whatever you do please be sure to check back tomorrow for my next installment, which includes a travel item being upcycled for your home.


Wednesday, April 18, 2018

Grab your Picture Frames


Picture frames of all sorts are a staple for yard sales and thrift stores. You see them in all shapes, sizes and materials but the questions is what could you do with them other than just reuse them as they are.
How about upcycling them into all kinds of different purposes, that have nothing to do with just framing your pictures.

You are used to seeing them on your wall but how about your door? Who said a wreath has to be round? Check out these ideas from simple and Classic to Big and Bold!

Picture Frame Wreath
Under A Texas Sky has a great tutorial  for this Classic 

Or you can go all out like Celebrate and Decorate

A Late Summer Door Wreath designed around a picture frame
I don't normally go for flash but this is really an awesome statement piece! 
I might have found a great idea for Mother's Day! 
Now to find a frame...

Don't need anything to add to your door? How about your patio or porch? Grab a handful of frames from the Dollar Store and get ready to create something original for just a couple of dollars.

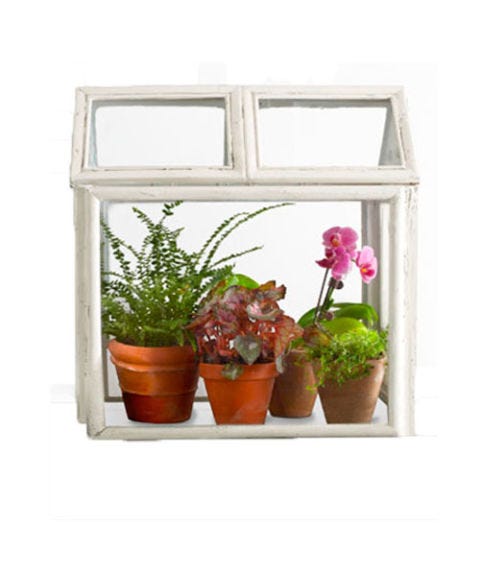
Terrariums can get expensive quickly especially for the larger sizes. Country Living Gives you a easy and inexpensive alternative step by step to make this victorian style indoor greenhouse.


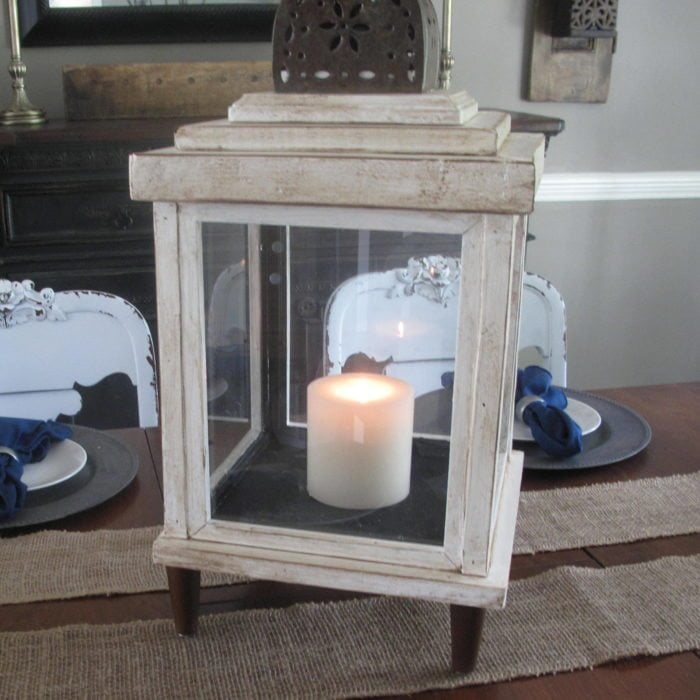
So instead of plants you need lighting? How about simple lanterns made from frames. I know I see these every time I go to Pier One, but who can afford those prices?!
DIY Lantern from scrap wood and frames Scavenger Chic for MyRepurposedLife.com
Joan posted this tutorial at My repurposed life  and she shows how easy it is to change your decor with the seasons. Shiny Red Balls or how about a Christmas Scene. This would work inside or out. You could even leave the top open for real candles.

How about adding some interest to your ceiling for way less than a regular medallion.  

The Decorating Chica Used this old frame to liven up her Chandelier, and it's even better because it came from a family members home! 

Just see what Bonnie from Romance under the stars created with a frame and some molding. WOW!

So now from over the table to on the table, how about Trays from Frames?

A Lapin Life created this with a bit of paint and a transfer.. You could use a coordinated fabric to create a stunning addition to your table setting or Tea Time. 

These tiered trays are on my want to do list

Frames to tiered tray- What Treasures Await

So are ya'll ready to take those pictures off of the wall and put them on the door, the ceiling and on the table, yet? Go you have another great idea for Picture Frames? Share with us so we can get on board too!

Thanks for following along with the A to Z Challenge this April and be sure to check back each day in April except for Sundays for a new letter as we blog the alphabet. I'll have more upcycled tips for  you tomorrow that go with Q!

Wishing you a very Creative Day!


Tuesday, April 17, 2018

Ornaments for the O In the A to Z Challenge


We're skipping around Holidays here, yesterday we talked about Father's Day gifts with Neckties and today I'm jumping to Christmas, so I can pick up a couple of ideas to reuse those ornaments.

Ornaments aren't just for your tree or just for the Cold winter seasons anymore. Many vintage ornaments came in pastels and bright colors, with a bit of craftiness you can upcycle them into everyday or still just holiday designs.

How about a Topiary for your entry or for table tops. Simply Designing created this design from things she just had laying around. Styrofoam ball, hot glue and of course ornaments

 Ornaments also make great Wreaths, which also don't have to be just for Christmas 


I found this "how to" on Bloglovin by liveloveDIY

Do you have some vintage ones that you love but are afraid to use? Try this Shadowbox idea

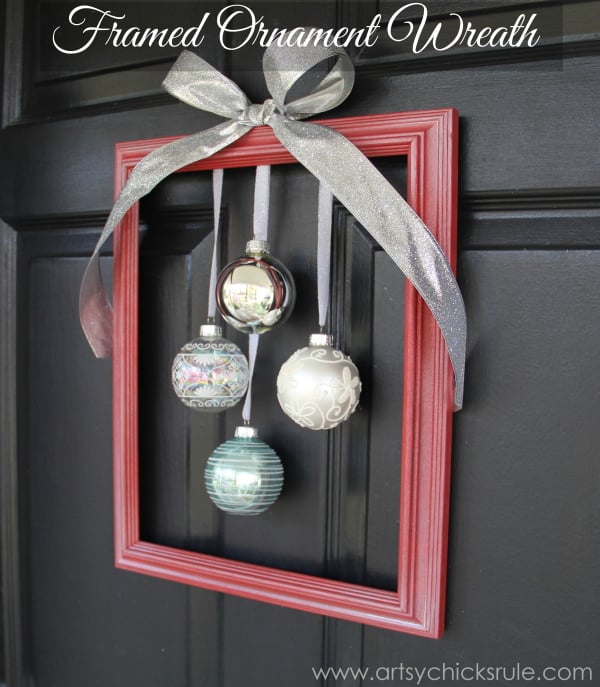
They can be used as displays or wreaths when pared with a frame and a little ribbon. Paint to match the season or your decor.

Easy, DIY Framed Ornament Wreath - tutorial - Welcome Home Tour - #wreath #diy #ornamentwreath artsychicksrule.com
Tutorial and Image from ArtsyChicksrule


Upcycling Christmas isn't just for the ornaments, pull out some of those big glass lights too.
They make very cute lightening bugs for your garden. I just had to sneak this one in there..


Wow! We've made it all the way to O and P's next check back  tomorrow to see what can  be done with a Picture frame. And while you're poking around be sure to check in with others that are Blogging from A to Z


Friday, April 13, 2018

What can you do with a Ladder?


That's right I'm talking about bringing something from outside to use inside and giving it a new life! Here are a couple of examples of ladders that I've picked up recently at different auctions.
This one needs a bit of repair but I think it's new life will be for blankets. I had thought about making shelving out of it but the changes that would have to be made would take away it's character.
 

I love the rusty hardware, I do have two sets of "hanging bars and a large Guide Runner"

Nope your not in the upsidedown, I didn't think about the fact that I would post it when I took the picture..lol

These are some very old mercantile ladders that we're taken out of a Dry Goods store in the area. They are easily early 1900's F. E. Myers & Bro's one is marked. Some minor early repairs. These are very tall, 15 feet at least! Two are for sale (if you're interested..lol) and one I'm trying decide just how to use it, book shelf, Library Ladder, Yarn store,  Hanging display, Loft ladder? The ideas go on and on. What would you do with them? 

Here are a few finished ideas now that you have the ladder bug too!
Click to see more photos of this lush and lovely potted garden on DIY ladder shelving! | LoveGrowsWild.com
I originally thought I would do something like Liz did @ Lovegrowswild with mine but not quite the right shape..doesn't mean I'm not still on the look out for one that will work

Do you have a corner that needs sprucing up? Check out this idea from Freshmommyblog

Ladder Shelf blog-12
I fell like this would be a great idea for the super long ladders I have but I hate to cut them!!

How about a room divider or a display This one does double duty.

Neutral rustic Christmas decor

Even small ladders are getting on board (bad pun I know..)
Short ladders can work as nightstands

It is Friday the 13th so if you are out hunting for ladders make sure you don't walk under any!
As we head into the weekend, I'll be finishing out the week with how to use an M item. All month I've been parting part of the A to Z Challenge by using the letter of the day to give you ideas on upcycling items you can find in your garage, yard sales or thrift stores. I started with Armoires then moved along the alphabet, this post marks half way, and will finish up on the 30th with a Z item. Be sure to check back often for more ideas!